Tuesday, January 31, 2012

Urban Nine Patch Quilt Along (design)

When it comes to picking out fabric for a quilt, it's good to know the quilt design.  

I think.... quilt design and fabric selection go hand in hand!  Have you ever looked at a quilt and absolutely loved it?  Is it because you loved the fabric that was used, or did you love it because of the quilt design? 

As you view each design below, think about your fabric selection.  Each design gives off a slightly different look, just by changing the dark and light colors.  

I've come up with the design.... Now it's your job to come up with fabric selection and the look you want to achieve with it!

Design #1


For this design, notice the continuity of the white curves and the gray background.  It really helps your eye focus on the design, even though there are still a lot of other different colors being used.

Weather you choose to used solids or prints for your fabric choice, keep in mind to stay consistent with a couple of fabric selections.  For instance all of the same small print fabric for your background or for the curve pieces on the outside of your nine patch.
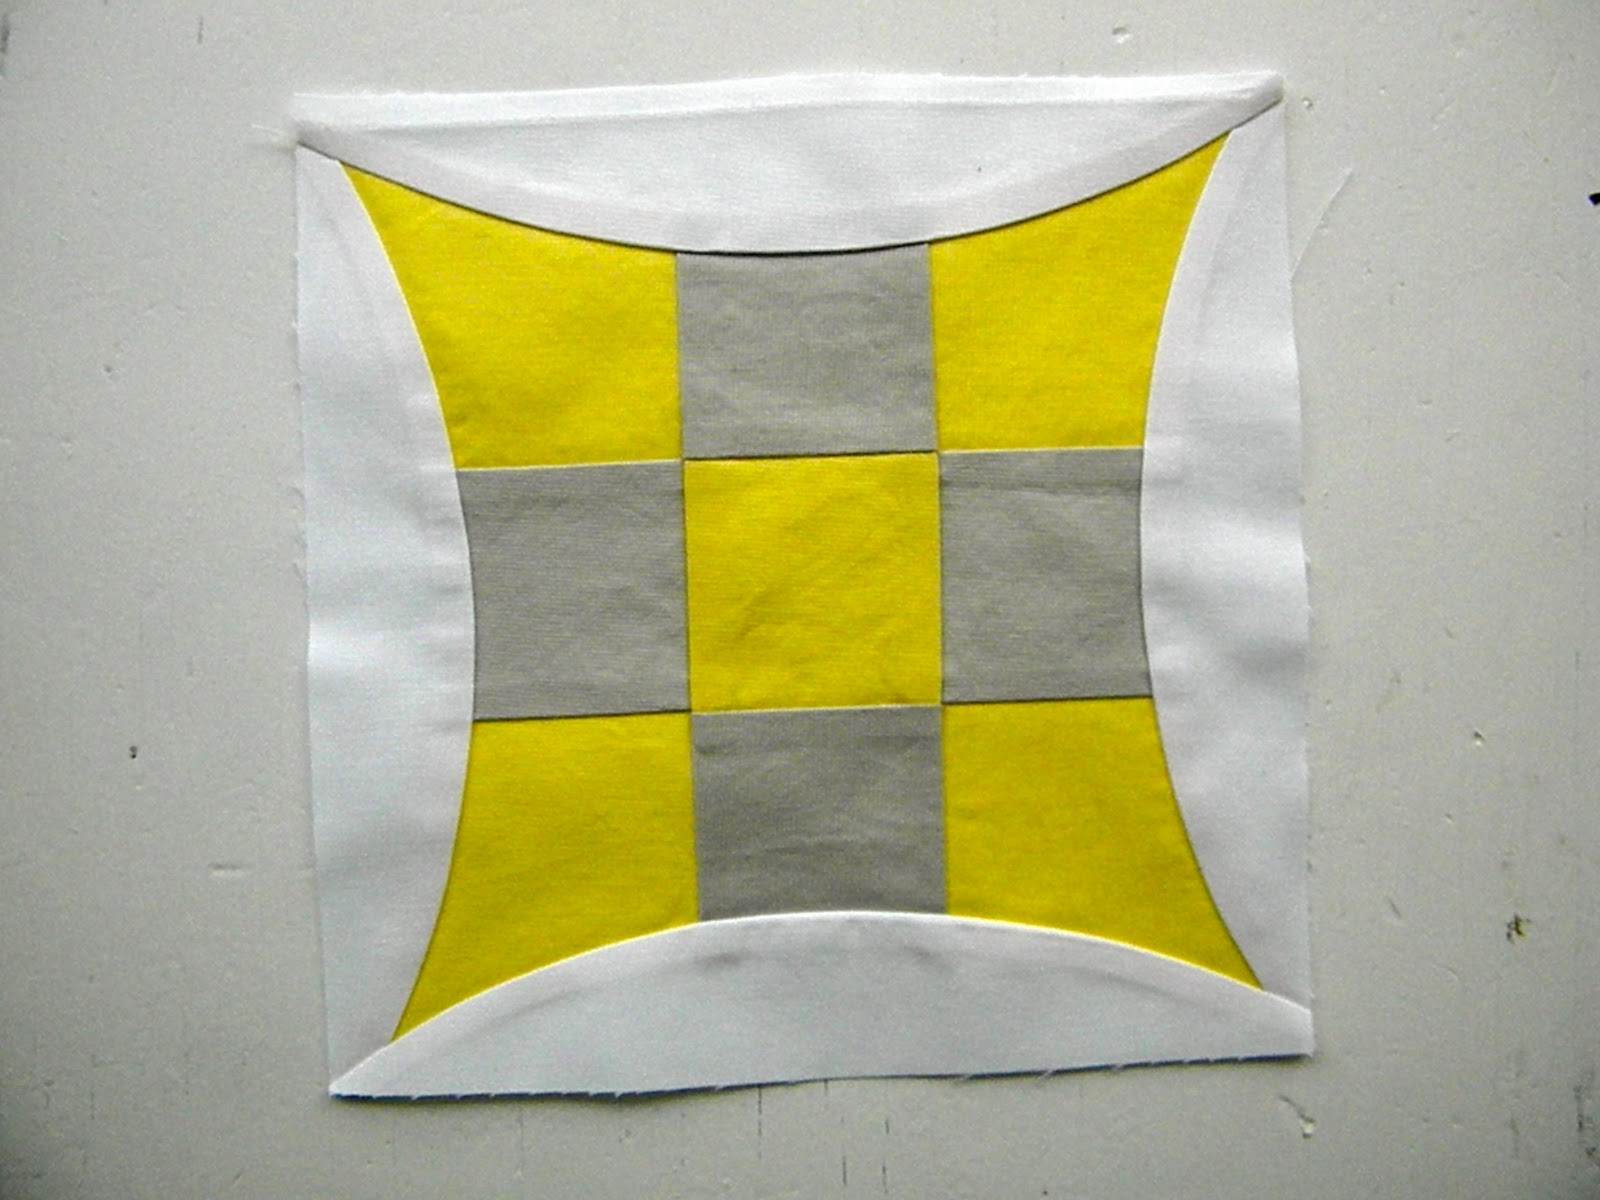
Design #2


For this design,  I replaced the gray background for white.  Now your eye tends to look at the skinny curves and the bright colors are showed off too.

So when thinking of fabric selection,  keep in mind your dark fabrics to your light fabrics.  I like a lot of contrast.  As you notice in the diagram, all my nine patches have lots of contrast.

Design #3


In this design, the only white I've used is for the background edges.  I even used a gray for my 1/2 square triangles (notice block sample, upper left).  The white ovals really pop out and the color seams to blend in with the gray.  

Design #4


This is one of my favorites!  I love the consistency of all the gray curves and the white background.  The nine patches, really pop out in the layout too.  Again....I used a gray for the 1/2 square triangles instead of the white background. (sample, upper left of design)

Design #5


This design uses the gray for the outside nine patch curve and a white for the background.  When I look at this design,  I don't see the circular design as well, but I see the Urban Nine Patch blocks.  And the nine patches don't stand out, like in the design before.

Design #6


In this design the Urban Nine Patches are floating.  This is done by adding 1-2" strips in between the blocks and a border around the outside of all the blocks.

These designs are all examples made up of 9 blocks.  Now this is where you come in and I'm leaving it up to you.  

9 blocks (3 across, 3 down)
  12 blocks (3 across, 4 down)
16 blocks (4 across, 4 down)
20 blocks (4 across, 5 down)

Each block, finished is a 12" square.

Sample of 12 blocks:


Sample of 12 blocks with strips and borders:


You get the point, right?
 
And a big thanks to all of you participating, it's more than I ever anticipated!  I did a shipment of rulers last Saturday and a shipment yesterday.  A few were international orders and so I want to make sure those make it, before I put up the tutorial.

...so in the meantime, think about the designs and the look you want to achieve.  

Tomorrow, I will talk about fabric...both solids and prints and share with you some tips on how I, put fabrics together.

And for fabric requirements...well that will depend on how and what design you decide on. 

This diagram shows you your fabric requirements per block:


If you would like to put your nine patches together ahead of time, just make sure to use 1/4 seam allowance.  
You want your finished nine patches to be a 8 1/2" square.

I will post the tutorial beginning of next week and the Quilt along will go for 12 weeks.

...oh and if you want to show other quilters out there what your working on......


Thanks and remember....tomorrow will be all about fabric!

 ~Jenny~


Thursday, January 26, 2012

"Urban Nine Patch"

Interested in a curvy quilt along?  

Have you bought the Quick Curve Ruler and have not put it to use yet?

Have you been thinking of getting the Quick Curve Ruler?

Maybe the "Urban Nine Patch" will entice you!


The "Urban Nine Patch" Curvy Quilt Along will start next Thursday!  I will admit I've never been part of a Quilt Along and would LOVE, first, your participation and second, your suggestions.  Leave a comment letting me know you would love to join in and any suggestions for me that has to do with a Quilt Along.

 The "Urban Nine Patch" is a great way to use some of your beautiful scraps, prints or solids or maybe you have a fabric line you haven't known what to do with...this would be a great block for that too! 

Just imagine, after you've made multiple "Urban Nine Patch" blocks, the design that will be created when sewed together!  The finished block will end up being a 12" x 12" square.  It won't take many, sewn together, to create an awesome quilt!

It's not to late to order your Quick Curve Ruler so you can join in on the "Urban Nine Patch" Curvy Quilt Along too!
 
Okay....quilters, let's get our CURVE on!! 


Wednesday, January 25, 2012

Curve Nine Patch Tutorial

This tutorial show's how to make a curved nine patch using the Quick Curve Ruler:


Nine Patch Block
(1) 2 1/2" x 2 1/2" square (center)
(4) 2 1/2" x 3 1/2" rectangle (middle sides)
(4) 3 1/2" x 3 1/2" square (corners)

Outside curve's:
(4) 8 1/2" x 2" rectangle 

Quick Curve Ruler

 Assemble pieces for nine patch in order above.

8 1/2" x 8 1/2" square
Place the Quick Curve Ruler over left side of block, making sure to center block between the dotted reference lines and the left edge of block sits under the 2 1/2" mark on the ruler.  Make your cut.

 Flip block and continue to cut each side of block.  

Stack and place the (4) 8 1/2" x 2" rectangles under the ruler, making sure to center in between the dotted reference lines and between the 1" and 3" lines on the ruler.  Make your cut.

Discard the fabric on the right. 

To view a video tutorial on how to piece curves go to the upper left corner of my blog.  
Place the outside curve piece about 1/4 - 1/8 in from corner of nine patch. (you don't have to be exact, since we will be squaring the block up)  Sew your curve on, repeat for opposite side of block.

This is a view of the back.  I press my seams open for this block to eliminate bulk.

Place the outside curve piece about 1/4 - 1/8 in from corner of nine patch.  Sew your curve on, repeat for opposite side of block.  Press.

before squared up
Square block to a 8" square, centering as well as you can.


Now you have and 8" Curve Nine Patch Block!
The nine patch will end up floating with in the block.

Tomorrow, I've got a surprise...that will go along with the curve nine patch and maybe even a Curvy Quilt Along!

~Jenny~


Monday, January 23, 2012

Like Mom...Like Daughters!

I have one ultimate goal in life when it comes to my daughters....and that is to turn them into quilters ;o)

The other day we cleaned up an area downstairs and Brittany and Brooke wanted to use that area for their sewing.  They did up a couple of quilts over the weekend and I think they were having fun...he..he.. of course a little nudging from MOM!


This is one of the quilts they did up.  We went to our local Joanne store and they bought a little charm pack...cut them in half....sewed them to a white piece of the same size.  Originally we were going to have them floating with some white sashing and borders in between...but after they lay ed them out like this, it turned out to be a really cool design.


The girls did a straight wavy line for the quilting.


This is Brittany...first time on the Long Arm!  It was really scary for her at first, but she felt more comfortable as she went. 


Brooke is quilting a swirly loop....she had to stand on a stool so she could see better and reach the handles better.  


They both had fun...they've been asking me for quite a long time if they can use my longarm, so finally we had some time yesterday for them to use it!  They were wondering how I could ever get tired of longarming, because it's SO MUCH FUN!!  


After we were done quilting, they thought that was it!  Oh no... I reminded them about the binding and they didn't think that was necessary and to just cut the quilts off and leave the binding off.  Of course I would not let that fly....I reminded them that that's all part of quilting!  So we managed to get the one binding done so far.

They are going to hang it up on their wall today!

...oh and I thought this was funny... Brittany told me when she went to bed the other night all she could do was think about her quilts and was excited to work on them the next day.  I told her she caught the "quilt bug" and that's what I do ALL THE TIME!

I'm linking up today to Canoe Ridge Creations Sew Modern Monday for the Girls!  Good Job girls, I'm so proud of you!


~Jenny, Brittany and Brooke~

Sunday, January 22, 2012

Baby Girl Quilt

Over a year ago, I made these blocks and ended up not using them.    
I've always loved the fabrics and color scheme and when I found out my friend Alicia was having a baby girl, I thought these blocks would make a cute baby girl quilt.


I took the basic oval shape, made from my Quick Curve Ruler and put them together by alternating the direction of each block.


I used my homemade pattern for my quilting design. 


I used 2 flannels pieced together for the back...I love how soft it makes it for a baby quilt and I used one layer of warm and white for the batting.


...and I was really excited when I found a half yard of this Amy Butler fabric in my stash for the binding I had used in the quilt.


...so what a great idea for a baby quilt, right?  So....if you've bought the Quick Curve Ruler and need an idea for a quilt, all you do is make your basic oval block (directions in the free runner pattern) and then alternate them, add a small binding and you now have an original baby quilt!

~Jenny~

Saturday, January 21, 2012

Curved Nine Patch

...don't ask me why I've never thought about doing a curved nine patch with my ruler till yesterday...  and if I'm not mistaken you use templates to create a curve nine patch....a template for the corner's and one for the middle side pieces....

...but maybe there is an easier way!
First I started on my design program and made this:


I want my block to end up being and 8" square...this gave me an idea how big to cut my squares and rectangles...

..then I started cutting into the fabric... made a nine patch: a square for the center and corners and rectangles for the side centers.

This is my first block:


 ...basically I took my ruler, cut out the curve on each side of the block...then cut out my side pieces also with my ruler, sewed them on to the nine patch and ended up with a not so pretty, to small and wasn't able to square it up block....you know how I love to square everything up.

next attempt:


played around with different size squares and rectangles for the nine patch...cut the sides out with my ruler a bit different and then sewed on my curve pieces and ended up really...really...miscalculating!  Cut it all off and now I have just a nine patch....major mess up!

last attempt:


Finally!!  I calculated the squares and rectangles so my nine patch ends up being 8 1/2" square....which is the smaller size reference curve dimensions on my ruler.  This helps me when cutting out my curves for the side of the nine patch so I can line it up perfectly on my ruler.  Sew my side curve pieces on to the nine patch and square up to a perfect 8" square!

Now if you could only see how many mishap blocks I have in my "mishap drawer"....some day I'm going to make a "mishap quilt"!

...then of course I went to bed last night dreaming up designs, using the curved nine patch!

~Jenny~

Thursday, January 19, 2012

Fabric Envy Giveaway!

Fabric Envy is doing a fantastic giveaway on her blog!  


Welcome to Paris
Enticing!!
Go to Andrea's blog and enter to win!  

~Jenny


Monday, January 16, 2012

...and more curves!

...warning!  When visiting my blog, you will be curved attack!!  You would think I would get tired of this curve thing, but I'm not!  You would think I would run out of designs to do up, I'm not!  

I cut the fabric out for this quilt on Saturday night and started putting it together yesterday.  It's actually one of the very first designs I came up with and was a no brainer for the curve shape.  And finally.... picked the fabric and color scheme I wanted to do for it and it's coming together so easy and it really is a very simple design.  But even though it's simple,  it will look really cool when I'm done!

 
I'm sort of in a solid fabric kick right now?  Funny how that works out sometimes.  Solids really do show designs so well though.

...also, I changed things up a bit for assembling this quilt.  I usually piece ALL my blocks first, then iron, then square up, then assemble.  This time I'm doing 3 stacks at a time...and then doing another 3 stacks and adding that on to the last.  It's fun this way,  you get to see how the quilt is coming together as you go!  

~Jenny~ 

Saturday, January 14, 2012

Fat Quarterly Designer Challenge

There's a Design Challenge going on over at Fat Quarterly today and the Challenge is to design a quilt using a curve, using the Quick Curve Ruler!   Ya....my ruler!!

Go over and check out the details!!  

...and I finished piecing this top last night:


Definitely my favorite so far!  It always seems the quilt I'm currently working on is my favorite. This quilt is going to be part of my next series of quilts and I love this design so much I'm doing up a second quilt with these yummy oranges:


I've been collecting oranges for a while now...and seeing how orange is the trendy color this year...well I've got two quilts in the making using oranges.

Don't forget to check out the Designer Challenge over at Fat Quarterly today and if your interested in viewing my free pattern that comes with the purchase of the ruler, please e-mail me, letting me know.

~Jenny~